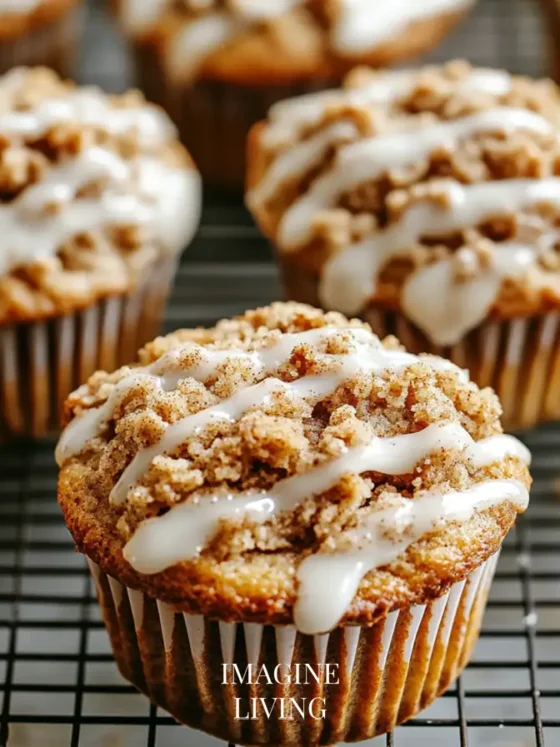
Imagine pulling a tray of golden-brown cinnamon rolls out of the oven. Each swirl is generously coated with a creamy glaze that drips down the sides. Today, we’re diving into this magic. You’ll learn how to make the best cinnamon rolls in your kitchen.
From making the dough to getting it to rise perfectly, we’ve got you covered. This guide will show you the secrets to success.
Key Takeaways
- Discover the ingredients and steps for making cinnamon rolls baked in a tray.
- Learn the tips for achieving the perfect dough consistency.
- Find out how to evenly apply a creamy glaze for ultimate decadence.
- Explore creative variations to enhance your homemade cinnamon rolls.
- Unlock the secrets to making the best cinnamon rolls every time.
Introduction to Heavenly Cinnamon Rolls
There’s something almost enchanting about the aroma of freshly baked cinnamon rolls wafting through the kitchen. It’s more than a dessert—it’s an embrace, a warm reminder of cozy mornings and cherished moments. These aren’t just cinnamon rolls; they’re an invitation to slow down, savor, and indulge in the little joys of life.
From the gentle kneading of dough to the satisfying swirl of cinnamon sugar, every step is a small celebration. And then comes the best part—the first gooey, melt-in-your-mouth bite, topped with a creamy glaze that feels like a hug for your taste buds.
So, let’s roll up our sleeves and craft something truly special together. These cinnamon rolls are more than a recipe—they’re a journey to pure comfort.
| Element | Description |
|---|---|
| Aromatic Dough | The foundation of our comforting breakfast treat, infused with hints of vanilla and flecks of cinnamon. |
| Rich Cinnamon Filling | A mixture of sugar, cinnamon, and butter that creates those classic swirls. |
| Velvety Creamy Glaze | The finishing touch, adding a sweet, creamy layer on top of the warm rolls. |
Now, let’s start this culinary adventure. Whether you’re a seasoned baker or a newbie, this cinnamon roll recipe will guide you. Ready to dive in and bake these delightful rolls? Trust me, it’s easier than you think—and the result is always worth it.
Ingredients Needed for Homemade Cinnamon Rolls
To make our cinnamon rolls, we need three main parts: the dough, the filling, and the glaze. Each one works together to create a delicious mix of flavors and textures. We’ve picked out the best ingredients, including fresh yeast, quality flour, and real cinnamon.
With these ingredients ready, you’re already on your way to making a tasty treat.
Essential Dough Ingredients
Making the dough right is key to the best cinnamon rolls. Here’s what you’ll need:
- 1 cup (240 ml) whole milk, warmed to 110°F (43°C)
- 2¼ teaspoons (7 g) active dry yeast or 21 g fresh yeast
- ¼ cup (50 g) granulated sugar
- 4 tablespoons (57 g) unsalted butter, melted
- 1 large egg, room temperature
- 3½ cups (440 g) all-purpose flour, plus extra for dusting
- 1 teaspoon salt
Cinnamon Filling Ingredients
The cinnamon filling makes these rolls extra special. You’ll need:
- ¾ cup (150 g) brown sugar
- 4 tablespoons (57 g) unsalted butter, softened
- 2 tablespoons ground cinnamon
- 1 pinch of salt
Creamy Glaze Ingredients
The glaze adds a rich touch to our cinnamon rolls. Here’s what you’ll need for the glaze:
- 4 ounces (113 g) cream cheese, softened
- 1 cup (120 g) powdered sugar, sifted
- 2 tablespoons (30 ml) milk (more as needed)
- ½ teaspoon vanilla extract
- 1 pinch of salt
With these ingredients, you’re ready to make delicious homemade cinnamon rolls. Each one is important for getting that perfect sweet and spicy taste we all love.
How to Make the Best Cinnamon Roll Dough
The foundation of any remarkable cinnamon roll is the dough. This section guides you through making the dough, from waking up the yeast to letting it rise. Each step is key, and we’ll share tips to make sure your dough is just right. With patience and love, you’ll see simple ingredients turn into a dough that bakes up beautifully.
Mixing the Dough
To make the perfect cinnamon roll dough, start by activating your yeast. Let’s start with the magic: yeast. It needs just the right temperature to wake up and do its thing—about 100–110°F (37–43°C). Too hot, and you’ll send it to yeast heaven (RIP). Use warm milk here; whole milk gives the richest dough, but oat, almond, or soy milk work beautifully if you’re going dairy-free.
Tip: If you’re not sure about the temperature, dip a clean finger in—it should feel like a warm bath, not a sauna.
Mix the warm milk, yeast, and 1 tablespoon of sugar in a small bowl. Give it a gentle stir and let it sit for 5–10 minutes. If you see bubbles or foam, you’re in business! If not, double-check your milk’s temperature or the yeast’s freshness.
In a large bowl, combine the flour, remaining sugar, and salt. Create a well in the center (think a flour volcano waiting to erupt). Pour in the yeast mixture, melted butter, and eggs. Mix until it starts coming together into a shaggy dough.
Transfer to a lightly floured surface and knead for 8–10 minutes until smooth and elastic. Don’t rush this—kneading is where the magic happens! (Or let your stand mixer and dough hook do the work for 5–7 minutes.)
Letting the Dough Rise
Place the dough in a greased bowl, cover it with a clean towel, and let it rise somewhere warm for about 1–2 hours, until it’s doubled in size.
Tip: If your kitchen is chilly, let the dough hang out in the oven with the light on—it’s like a mini tropical vacation for yeast.

Tips for Perfect Dough Consistency
Getting the dough just right can feel like an art. Here are some tips for homemade pastry dough:
- Flour Matters: Too much flour will make your dough dry, and too little will leave it sticky. Add flour gradually, mixing just until the dough comes together smoothly.
- Temperature Check: Make sure your liquids are warm (not hot!) to activate the yeast without killing it.
- Knead with Love: Knead your dough until it’s smooth and elastic. By hand, this usually takes 6–8 minutes; with a stand mixer, it’s closer to 4–5 minutes. This step develops the gluten that gives the dough its structure.
- Patience is Key: Let the dough rise fully, and don’t rush it. A cozy, draft-free spot is ideal. Watching it double in size is like witnessing a small miracle—it’s worth the wait for that fluffy, perfect texture.
Prepare the Filling
While the dough rises, mix the brown sugar and cinnamon in a small bowl. Softened butter is your spreadable hero here, so make sure it’s nice and pliable.
Assembling Your 3×4 Cinnamon Rolls Baked in a Tray, Creamy Glazed
Now, let’s get to the fun part—putting together our cinnamon rolls! We start by rolling out and cutting the dough. Then, we arrange the spirals in our tray for their second rise.
Rolling and Cutting the Dough
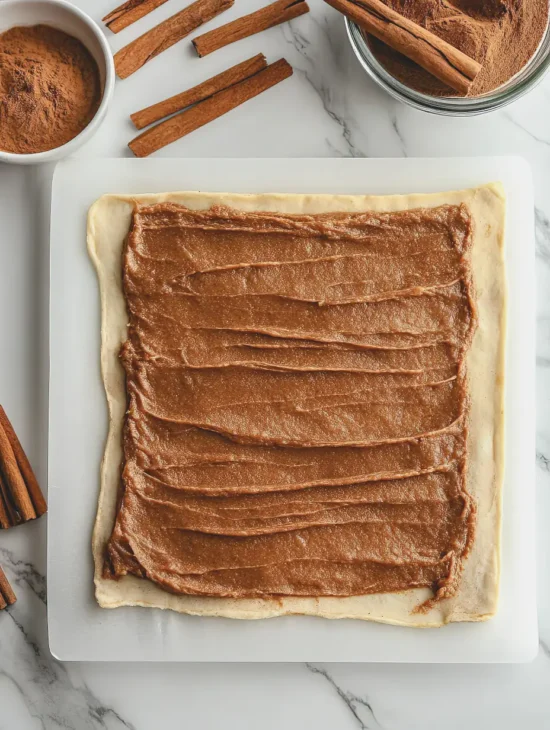
Begin by spreading the dough on a floured surface. This step is exciting, with the smell of fresh dough! Roll the risen dough into a rectangle (about 16×12 inches).
Next, spread cinnamon filling evenly over the dough. For a little extra pizzazz, scatter some raisins or nuts if you’re feeling fancy.
Roll the dough up tightly from one long edge, like you’re rolling up a sleeping bag. Seal the seam with a gentle pinch.
Slice into 12 even pieces .

Arranging in the Tray
Arrange each roll cut-side up in a greased or parchment-lined 9×13-inch baking dish. This ensures they have enough room to expand during baking. Each roll sits cozily against its neighbor, ready to rise and meld together beautifully.
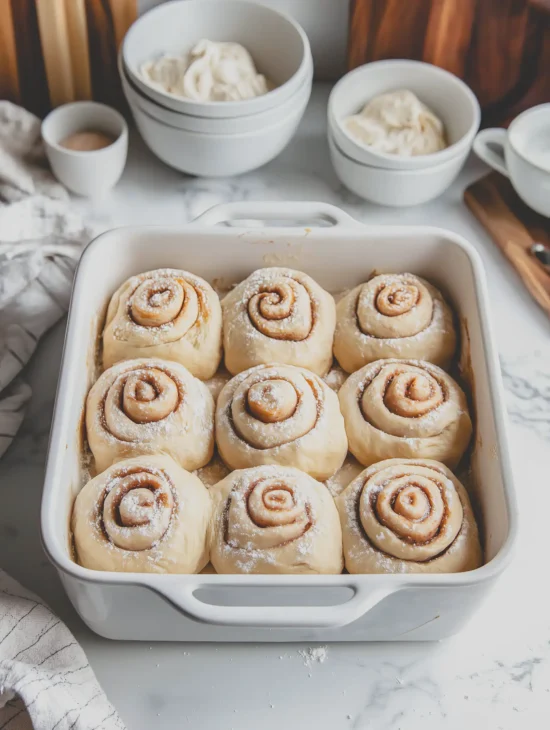
Second Rise of Dough
Cover the dish with a towel and let the rolls puff up again for 30–45 minutes in a warm place. They should look soft and pillow-like.
Tip: This second rise is crucial—it’s what gives them that dreamy, fluffy texture. Be patient!

| Step | Action | Tip |
|---|---|---|
| 1 | Roll out the dough | Keep it evenly thick |
| 2 | Spread the cinnamon filling | Go edge-to-edge for full flavor |
| 3 | Roll the dough into a log | Roll tightly to maintain shape |
| 4 | Cut into 12 pieces | Measure each piece for uniformity |
| 5 | Arrange in a 3×4 pattern | Ensure even spacing |
| 6 | Allow for the second rise | Let them double in size |
With these steps, we transform simple dough into a tray of tantalizing, soon-to-be-baked cinnamon rolls. This process is the heart of assembling cinnamon rolls, setting the stage for that final, glorious bake.
Baking Your Tray of Cinnamon Rolls
As the oven heats up, the kitchen fills with a sweet aroma. Putting the tray of cinnamon rolls in the oven is the exciting part. This guide will help you bake them to perfection, making them fluffy and golden.

Optimal Baking Time and Temperature
For the best tray-bake cinnamon rolls, preheat your oven to 350°F (175°C). This temperature helps the dough rise evenly and cook without burning. Bake them for about 20-25 minutes (or until golden brown) to get a soft inside and a lightly browned outside. Check them often to avoid overbaking.
How to Know When They’re Done
To check if your cinnamon rolls are done, look for a golden-brown color and a sweet smell. Around 25 minutes, check if the tops are golden and the centers have risen. If the outer rolls start to pull away from the tray, they’re probably ready. Pressing the tops should feel firm but springy. These signs will help you bake perfect cinnamon rolls every time.
Create a Decadent Cinnamon Roll Icing
No cinnamon roll is complete without its crowning glory: the cinnamon roll icing. To create a truly decadent frosting for cinnamon rolls, you need to master a few homemade icing techniques that bring out the best in your baked treat.

First off, let’s gather our key ingredients. You’ll need a solid base of powdered sugar, a splash of milk, and a touch of vanilla extract. But don’t stop there—adding a pinch of salt and a dollop of cream cheese can elevate your frosting to a whole new level. Let’s dive into the step-by-step process that transforms these simple ingredients into a luxurious, melt-in-your-mouth glaze.
- Mix the Ingredients: Start with your powdered sugar, milk, and vanilla in a bowl. Whisk until smooth.
- Incorporate the Secret Touch: Add a pinch of salt and a generous spoonful of softened cream cheese—this is your game-changer.
- Achieve the Perfect Consistency: Continue to mix until your icing is perfectly smooth and lush, adding more milk if needed.
With these steps, you’ll master the art of homemade icing techniques, ensuring your cinnamon rolls are always crowned with a decadent, irresistible frosting. The beauty of this cinnamon roll icing recipe is that it allows for personal tweaks and additions, letting you create a signature glaze that your family and friends will rave about. Here’s a quick comparison of standard vs. decadent frosting ingredients:
| Standard Icing | Decadent Frosting |
|---|---|
| Powdered Sugar | Powdered Sugar |
| Milk | Milk |
| Vanilla Extract | Vanilla Extract |
| Pinch of Salt | |
| Softened Cream Cheese |
By following these tips and methods, you’re on your way to creating the most indulgent, crowd-pleasing cinnamon roll icing imaginable. Now, let’s get ready to pour that creamy decadence over our freshly baked rolls! (Remember to sift the powdered sugar to avoid lumps!)
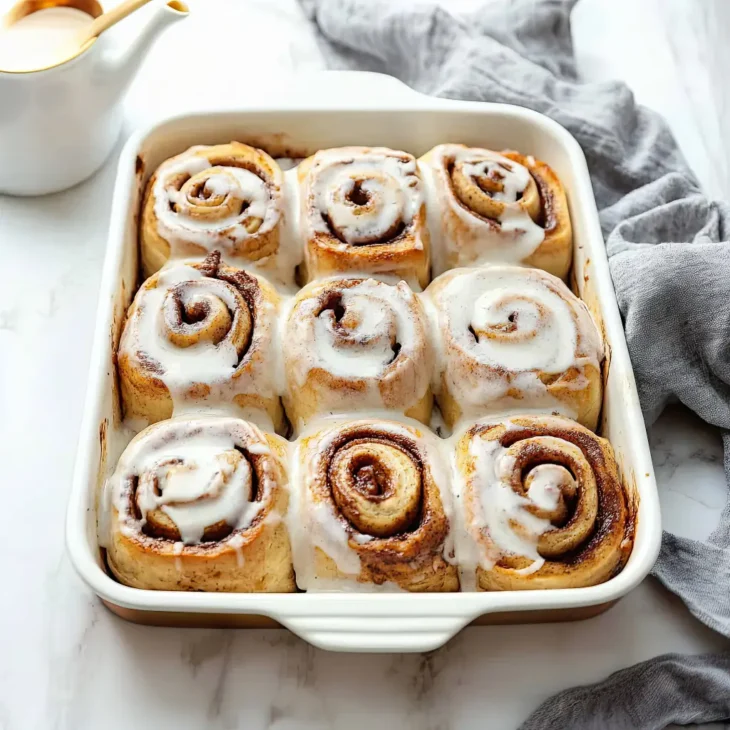
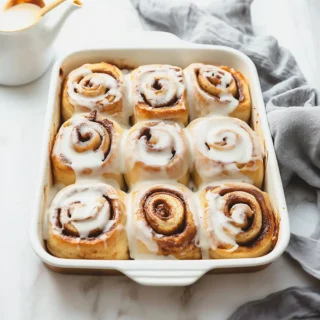
Pouring the Creamy Glaze Over Cinnamon Rolls
The final touch is the creamy glaze. It’s what makes these cinnamon rolls irresistible. Let’s prepare our favorite glaze and learn how to apply it perfectly.
Applying the Glaze Evenly
Now, it’s time for the glaze application. Wait until the rolls are warm, not hot, to pour the glaze. This way, it will soak into the rolls nicely. Start by drizzling in a sweeping motion, making sure each roll gets an even coat. For extra luxury, add a second layer once the first has set a bit.

Serving and Storing Your Cinnamon Rolls
Once the creamy glaze sets, it’s time to enjoy your cinnamon rolls. Serve them warm for the best taste. I warm each roll in the microwave for 15 seconds to make the glaze melty again.
What if you baked too many? Don’t worry, we’ve got tips for storing them. Keep them covered on the counter for a day or two. Use plastic wrap or an airtight container to keep them soft.
For longer storage, freeze them. Wrap each roll in plastic wrap and then in a freezer-safe bag. To thaw, let them sit at room temperature or microwave them briefly. Here are some quick storage tips:
- Short-term: Store in an airtight container at room temperature.
- Long-term: Wrap individually in plastic and freeze.
Reheat thawed rolls in the microwave for 15-20 seconds or in an oven preheated to 350°F for about 10 minutes. These *freshness tips for cinnamon rolls* ensure they’re always served at their best, pleasing your taste buds every time.

For gatherings, serve cinnamon rolls with toppings. Offer nuts, extra glaze, or fresh fruits like berries. Here’s a quick summary of your options:
| Storage Method | Duration | Reheating Tips |
|---|---|---|
| Countertop (covered) | 1-2 days | Microwave for 15 seconds |
| Freezer (wrapped) | Up to 3 months | Microwave for 15-20 seconds or oven at 350°F for 10 minutes |
Why These Are the Best Cinnamon Rolls You’ll Ever Make
When it comes to cinnamon rolls, this recipe gets rave reviews. Bakers love it, and it’s easy to see why. Let’s explore what makes these cinnamon rolls so special.
Flavor and Texture Highlights
These cinnamon rolls are loved for their flavor and texture. What makes them so irresistible?
| Aspect | Description |
|---|---|
| Flavor | A sweet and spicy cinnamon filling, topped with a creamy glaze for extra sweetness. |
| Texture | Light, fluffy dough with slightly crisp edges for a memorable bite. |
These cinnamon rolls are a hit because they mix the best flavors and textures. They’re perfect for any occasion, from festive gatherings to cozy Sunday mornings. Many say they’re the best cinnamon rolls they’ve ever made.
Easy Cinnamon Rolls for Beginners
If baking cinnamon rolls seems scary, don’t worry. This section is here to help. I promise, you can make these simple homemade cinnamon rolls. We’ll break down each step so it’s easy to follow.

Starting with baking basics is key. We’ll go through an easy cinnamon roll recipe for beginners. You’ll end up with soft, gooey rolls that impress everyone. Here’s what you need to know:
- Prepare Your Ingredients Ahead of Time: Have everything measured and ready (flour, yeast, sugar, etc.). This makes the process easier.
- Simple Mixing Technique: Mix dry ingredients first, then add wet ingredients slowly. This avoids overworking the dough.
- Consistent Dough Rising: Let the dough rise in a warm, draft-free area. Cover it with a damp cloth to keep it moist.
- Rolling Out the Dough: Roll the dough evenly to avoid thick spots. This is important for even baking.
- Even Cinnamon Filling Spread: Spread the cinnamon-sugar mixture evenly for a perfect swirl in every bite.
- Proper Baking Time and Temperature: Watch your oven closely. Cinnamon rolls bake best at a moderate temperature until golden brown.
At first, making these rolls might seem like an experiment. But once you get the hang of it, it’s easy. Enjoy these baking basics for beginners and remember, practice makes perfect.
| Step | Action | Tip |
|---|---|---|
| 1 | Prepare Ingredients | Measure ahead of time for efficiency |
| 2 | Mix Ingredients | Combine dry, then gradually add wet |
| 3 | Let Dough Rise | Warm, draft-free area |
| 4 | Roll Out Dough | Ensure even thickness |
| 5 | Spread Filling | Evenly for consistent flavor |
| 6 | Bake | Watch for golden brown color |
Don’t worry if your first batch isn’t perfect. Every roll you bake brings you closer to mastering simple homemade cinnamon rolls. Happy baking!
Creative Variations on Classic Cinnamon Rolls
Once you’ve mastered the classic cinnamon roll, it’s time to get creative. Let’s dive into adding fruits, nuts, and spices to make our favorite treat even better.
Adding Fruits and Nuts
Fruits and nuts can make cinnamon rolls even more special. Dried cranberries or raisins add a sweet burst, while chopped pecans or walnuts add crunch. These additions not only change the texture but also add a rich flavor. Try dried apricots or figs for a unique twist.
Using Different Spices
Spices can also transform your cinnamon rolls. Try adding cardamom, nutmeg, or pumpkin spice to the mix. These spice-infused rolls can take your taste buds on a journey. Cardamom adds a warm, aromatic flavor, while nutmeg brings a festive touch. The options are endless, and the results are sure to wow.
| Variation | Key Ingredients | Flavor Profile |
|---|---|---|
| Fruit and Nut | Raisins, Pecans, Figs | Sweet, Crunchy |
| Spice-Infused | Cardamom, Nutmeg, Pumpkin Spice | Warm, Aromatic |
Conclusion
Our cinnamon roll baking journey has come to an end. But the real joy is in the process, not just the final product. The guide we’ve shared is more than recipes. It’s about the warmth and love that cinnamon rolls bring.
Baking these rolls is more than cooking. It’s about making memories. The smell of cinnamon and the first bite bring joy. It shows us the true love in baking.
Whether you’re new to baking or experienced, making cinnamon rolls is rewarding. We’ve given you tips and stories to help your rolls be perfect. So, let’s enjoy more smiles, warm kitchens, and delicious cinnamon rolls. Happy baking!
FAQ
How do I make the best cinnamon roll dough?
Start by mixing high-quality flour with fresh yeast, sugar, salt, milk, and eggs. Knead the dough until it’s smooth and elastic. Let it rise until doubled in size. For more detailed steps, check out our section on perfect cinnamon roll dough.
What ingredients do I need for homemade cinnamon rolls?
You’ll need flour, yeast, sugar, salt, milk, butter, eggs, cinnamon, and brown sugar. Each ingredient is crucial for the perfect balance of flavors and textures in your homemade cinnamon rolls.
How do I assemble the cinnamon rolls in a tray?
Roll out your dough, spread the cinnamony filling, and slice into individual rolls. Arrange them in a 3×4 pattern on a baking tray. Let them rise a second time before baking them to golden perfection.
What’s the optimal baking time and temperature for cinnamon rolls?
Bake your cinnamon rolls at 350°F (175°C) for about 25-30 minutes. They should be golden brown and puffed up. Keep an eye on them as ovens can vary; they’re done when they reach a lovely golden color and the centers are set.
How do I know when my cinnamon rolls are done baking?
They’re done when they turn a beautiful golden brown and the centers are fully set. You can also use a thermometer to check the internal temperature—it should be around 190°F (88°C) for optimal doneness.
How do I make a creamy glaze for cinnamon rolls?
Combine powdered sugar, milk, and a splash of vanilla extract. Mix until smooth and pourable. For an extra creamy texture, you can add a bit of cream cheese or butter. Check our creamy glaze recipe for the detailed process.
What’s the best way to apply the glaze to cinnamon rolls?
Pour the glaze while the rolls are still warm for maximum absorption. Drizzle evenly over each roll, letting it seep into the layers and edges for that dreamy, luscious finish.
How should I store my cinnamon rolls?
Store your cinnamon rolls in an airtight container at room temperature for up to 2 days. For longer storage, you can freeze them. To reheat, simply warm them in the oven or microwave until they’re soft and delectable again.
Can beginners easily make these cinnamon rolls?
Absolutely! Our easy cinnamon roll recipe breaks down each step into simple, manageable tasks. Even if you’re new to baking, you’ll find the process straightforward and rewarding.
Are there any creative variations I can try with cinnamon rolls?
Yes, feel free to get creative! Try adding fruits, such as raisins or apples, or nuts, like pecans or walnuts, into the filling. You can also experiment with different spices like cardamom or pumpkin spice to put a unique twist on the classic cinnamon roll.
Why are these the best cinnamon rolls I’ll ever make?
These cinnamon rolls stand out because of their perfectly balanced dough, rich filling, and decadent creamy glaze. Many home bakers have shared rave reviews, highlighting the fluffy texture and unforgettable flavor, making them a favorite in countless kitchens.
Cinnamon Rolls
Equipment
- Mixing bowls
- Stand mixer with dough hook (optional)
- Rolling Pin
- 9×13-inch baking dish
- Sharp knife or dough cutter
- Measuring cups and spoons
Ingredients
Dough:
- 1 cup 240 ml whole milk, warmed to 110°F (43°C) – Activates yeast and enriches dough.
- 2¼ teaspoons 7 g active dry yeast – Helps the dough rise.
- ¼ cup 50 g granulated sugar – Adds sweetness.
- 4 tablespoons 57 g unsalted butter, melted – Adds richness.
- 1 large egg room temperature – Provides structure and softness.
- 3½ cups 440 g all-purpose flour – Forms the dough base.
- 1 teaspoon salt – Enhances flavor.
Filling:
- ¾ cup 150 g brown sugar – Sweetens the filling.
- 4 tablespoons 57 g unsalted butter, softened – Makes the filling spreadable.
- 2 tablespoons ground cinnamon – Adds warm spice.
- 1 pinch of salt – Balances sweetness.
Creamy Glaze:
- 4 ounces 113 g cream cheese, softened – Creates creaminess.
- 1 cup 120 g powdered sugar, sifted – Sweetens the glaze.
- 2 tablespoons 30 ml milk (adjust as needed) – Adjusts consistency.
- ½ teaspoon vanilla extract – Adds flavor.
- 1 pinch of salt – Enhances flavor balance.
Instructions
Dough Preparation:
- Activate Yeast: In a small bowl, mix warm milk, yeast, and 1 tablespoon of sugar. Let sit for 5-10 minutes until bubbly.
- Mix Dough: In a large bowl, combine flour, remaining sugar, and salt. Create a well in the center. Add yeast mixture, melted butter, and egg. Mix until a shaggy dough forms.
- Knead: Transfer dough to a floured surface. Knead for 8-10 minutes (or 5-7 minutes in a stand mixer) until smooth and elastic.
- First Rise: Place dough in a greased bowl, cover with a towel, and let rise in a warm spot for 1-2 hours until doubled in size.
Filling Preparation:
- Combine brown sugar, softened butter, cinnamon, and salt in a small bowl until smooth.
Assembling the Rolls:
- Roll Dough: Roll dough into a 16×12-inch rectangle on a floured surface. Spread filling evenly across the dough, edge to edge.
- Roll and Cut: Roll dough tightly from the long edge. Cut into 12 equal pieces.
- Arrange and Second Rise: Place rolls in a greased or parchment-lined 9×13-inch baking dish. Cover and let rise for 30-45 minutes until puffy.
Baking:
- Preheat Oven: Preheat oven to 350°F (175°C).
- Bake: Bake rolls for 25-30 minutes until golden brown and fluffy.
Creamy Glaze:
- Make Glaze: Beat cream cheese until fluffy. Gradually mix in powdered sugar, milk, vanilla, and salt until smooth. Adjust milk for desired consistency.
- Glaze Rolls: Drizzle glaze over warm rolls, letting it seep into the layers.
Notes
Add nuts or dried fruits to the filling for variety.
Rolls freeze well. Reheat at 350°F for 10 minutes or microwave for 15-20 seconds.


Abby
12/28/2024Can these be prepped the night before and cooked in the morning?
Sandra&Martin
12/29/2024HI Abby,
Yes, cinnamon rolls can absolutely be prepped the night before and cooked in the morning. Here’s how:
Prepare the Dough and Rolls: Follow the recipe up to the point where the rolls are shaped and placed in the baking dish. Cover them tightly with plastic wrap or a lid.
Refrigerate Overnight: Place the covered dish in the refrigerator. This slows down the yeast activity and prevents overproofing.
Morning Prep: In the morning, remove the rolls from the fridge and let them come to room temperature (usually about 30–45 minutes). This allows them to rise a little more before baking.
Bake as Usual: Preheat your oven and bake according to the recipe instructions. Your cinnamon rolls should turn out just as fluffy and delicious!
While this method works beautifully, I personally prefer baking them right away. Yeast is a finicky little thing, and I find the rolls have a slightly better rise and fluffiness when baked fresh. That said, overnight prepping is a fantastic option if you want to save time in the morning—it’s all about what works best for your schedule! 😊
Abby
12/31/2024Thank you!!! I’ll be sure to keep you posted. Prepping them tomorrow for Wednesday morning!
Brenda
01/07/2025Made these today. They are yummy. Will be making them again.
Very easy recipe to follow
Sandra&Martin
01/07/2025Thank you so much for trying the recipe! We’re thrilled you loved them. Can’t wait to hear how your next batch turns out—happy baking!